The Petro Canada at Bronson and Somerset quietly reopened this past Friday after about six months of construction, which started shortly after the reopening of newly reconstructed Bronson Avenue. It comes complete with a convenience store at the corner, seen best at night in HDR.
Even though about three-quarters of Centretown residents walk, bus and bike as part of their regular commute to work and school, the car ownership rate in Centretown is about 1.3 cars per household. So when residents of Centretown, Chinatown and Dalhousie eventually have to fill their tanks, they have to go somewhere. After the closure of the Shell station at Gloucester, this station just on the far side of Centretown's Bronson border is one of the closest to downtown. (I'm not saying I regret the closure of the gas stations that used to pepper Centretown much more heavily!)
But just because a gas station is a car-oriented business, it doesn't mean it can't also fit into the fabric of a walkable urban neighbourhood. Before the construction photos, let's look at how the station used to look:
Showing posts with label HDR. Show all posts
Monday, March 10, 2014
An urban gas station in Centretown
View other posts on these topics:
Bronson,
Chinatown,
Construction,
DCA,
Demolition,
HDR,
Pedestrians,
Planning and Development,
Somerset,
Stores
Monday, November 18, 2013
Bad sectors in Centretown
View other posts on these topics:
90 Elgin,
Arlington,
Bank,
Bridgehead,
Bridges,
Bronson,
Construction,
Gilmour,
HDR,
Ottawa River,
Parliamentary Precinct,
Pathways,
Queen Street
Back in July, my hard disk drive crashed, losing two months' worth of photos (about 1600). At the end of October I got a surprise call from the guy I'd brought it to, who said he was able to recover over 90% of the data. I was able to push this to about 97% of the photos that I had taken since my previous backup.
Some of them, however, were damaged. The hard drive had bad sectors and in the recovery many of the photos were damaged (only a very small number were completely unreadable). The damage inflicted on them actually has a bit of an artistic tone to them. Here's a photo of 222 Queen Street (which is where the RMOC headquarters were before it moved to the building that's now City Hall):
I discovered that I actually had a more recent backup on an external drive, up to mid-June. From this, I was able to push the recovery rate to about 99% of my photos, since many of the damaged photos were taken before then. Here's the original of the photo above:
Some of them, however, were damaged. The hard drive had bad sectors and in the recovery many of the photos were damaged (only a very small number were completely unreadable). The damage inflicted on them actually has a bit of an artistic tone to them. Here's a photo of 222 Queen Street (which is where the RMOC headquarters were before it moved to the building that's now City Hall):
I discovered that I actually had a more recent backup on an external drive, up to mid-June. From this, I was able to push the recovery rate to about 99% of my photos, since many of the damaged photos were taken before then. Here's the original of the photo above:
Wednesday, June 27, 2012
Dominion-Chalmers in 3D
There's no Peds on Weds post today, as my list of pedestrian topics is full with complaints and problems, and I'd like to identify some more positive ones to balance it out.
Instead, I'd like to share another 3D image. I've refined my skills from the previous 3D image, showing a scene from the Bronson Avenue reconstruction, by taking better source photos and being more careful when processing them into something that looks good with red-blue glasses. This one's of the Dominion-Chalmers United Church on O'Connor Street between Cooper and Lisgar:
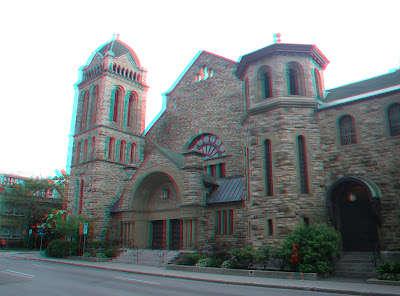
As with the previous 3D image I'm sharing the source images too. If you don't have 3D glasses you can theoretically "wiggle" quickly between these two images to approximate a 3D effect, though they would need some cropping before that would work well.
Unlike the previous one, I've made it full colour by retaining the green channel in this image (the two views were taken too far apart in the previous view, and when I tried to add the green channel it makes your eyes hurt to try to see the 3D). Since most of the 3D images I've seen growing up were red-and-blue line drawings, I didn't even know you could do this until I saw the instructions I followed. The way this still works, I suspect, is that one eye sees the blue and green channels, which are bold enough to tell your brain that this is what the object looks like, and the other eye sees the red channel, which the brain uses to add dimension to what it sees in the other eye. The three colours mix together as they would if they were all identical, creating the full colour. Photos with lots of bright primary colours don't do well with this because there isn't enough information for the two eyes to compare what they see.
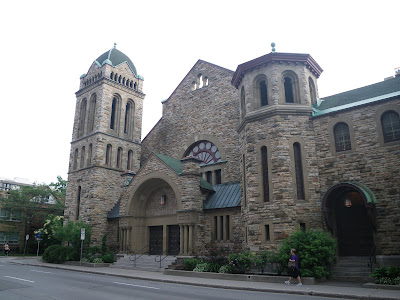
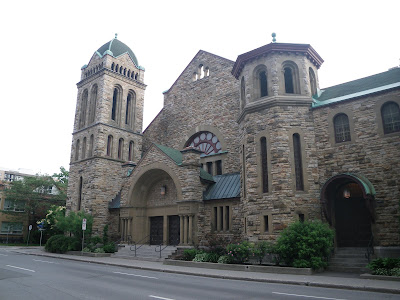
Since I'm taking photos with a single camera, it's a bit harder for me to get the second shot to match the first (with two identical cameras you can simply take the photos from two different angles at the same time to capture live images). What I've found works reasonably well is to pay attention to the nearest object in the image (for the church photo, this would be the nearest corner of the garden curb) and where it is in the frame. Then pay attention to reference points on the four edges of the frame (For example making sure the door on the right isn't cut off and that the camera sees the far corner of the curb along the roadside at Cooper). There aren't many up/down cues to work with, which is evident from the discrepancy between the two shots, but it's not really a problem because I can just crop out the parts that don't overlap.
Another trick I learned is to look through the glasses the 'wrong' way when creating the 3D photo. My eyes don't see 3D images too well, so sometimes I'm unsure if I've successfully created the 3D image. If you accidentally filter out the colours in the reverse order, your brain can't simply compensate, but when you flip the glasses the image pops right out and the cursor floats above it. Unfortunately, in the GIMP, once you filter out the colour channels, you can't add them back in, so you have to start over if you make this mistake.
I've got other 3D photos in production for future blog posts, and I'm also looking into where you can get some cheap red-blue 3D glasses locally. I also have a second camera, which I might start carrying with me...
[Look for more one-photo posts under the label Singles]
Instead, I'd like to share another 3D image. I've refined my skills from the previous 3D image, showing a scene from the Bronson Avenue reconstruction, by taking better source photos and being more careful when processing them into something that looks good with red-blue glasses. This one's of the Dominion-Chalmers United Church on O'Connor Street between Cooper and Lisgar:
As with the previous 3D image I'm sharing the source images too. If you don't have 3D glasses you can theoretically "wiggle" quickly between these two images to approximate a 3D effect, though they would need some cropping before that would work well. Unlike the previous one, I've made it full colour by retaining the green channel in this image (the two views were taken too far apart in the previous view, and when I tried to add the green channel it makes your eyes hurt to try to see the 3D). Since most of the 3D images I've seen growing up were red-and-blue line drawings, I didn't even know you could do this until I saw the instructions I followed. The way this still works, I suspect, is that one eye sees the blue and green channels, which are bold enough to tell your brain that this is what the object looks like, and the other eye sees the red channel, which the brain uses to add dimension to what it sees in the other eye. The three colours mix together as they would if they were all identical, creating the full colour. Photos with lots of bright primary colours don't do well with this because there isn't enough information for the two eyes to compare what they see.

Since I'm taking photos with a single camera, it's a bit harder for me to get the second shot to match the first (with two identical cameras you can simply take the photos from two different angles at the same time to capture live images). What I've found works reasonably well is to pay attention to the nearest object in the image (for the church photo, this would be the nearest corner of the garden curb) and where it is in the frame. Then pay attention to reference points on the four edges of the frame (For example making sure the door on the right isn't cut off and that the camera sees the far corner of the curb along the roadside at Cooper). There aren't many up/down cues to work with, which is evident from the discrepancy between the two shots, but it's not really a problem because I can just crop out the parts that don't overlap.Another trick I learned is to look through the glasses the 'wrong' way when creating the 3D photo. My eyes don't see 3D images too well, so sometimes I'm unsure if I've successfully created the 3D image. If you accidentally filter out the colours in the reverse order, your brain can't simply compensate, but when you flip the glasses the image pops right out and the cursor floats above it. Unfortunately, in the GIMP, once you filter out the colour channels, you can't add them back in, so you have to start over if you make this mistake.
I've got other 3D photos in production for future blog posts, and I'm also looking into where you can get some cheap red-blue 3D glasses locally. I also have a second camera, which I might start carrying with me...
[Look for more one-photo posts under the label Singles]
Monday, June 11, 2012
Bronson Avenue in 3D
View other posts on these topics:
3D,
Bronson,
Construction,
HDR,
Singles
During the ongoing Bronson Avenue reconstruction, sometimes the equipment is left out in the middle of the street over the weekend. It's neat to walk up to the excavator buckets and see just how big they really are. Unfortunately, whenever I've taken photos of them, their size just doesn't quite come through.
I realized a 3D image would be an effective way of doing it, and the wiggle stereoscopy technique would work. By making an animated GIF of two images taken side-by-side, I'd be able to convey it.
Once I had the images, I realized I could do even better: make a true red-blue anaglyph in GIMP, with the guidance of this YouTube video. Get out your red and blue 3D glasses, it works!
Ironically, that's easier for me to post on the blog than an animated "wiggle" image, because Blogger doesn't let you host animated GIFs.
Here are the component images anyway. You can download them (or open them in separate tabs) and switch back and forth between them to get a similar effect:

Now that I know how to do this, I'll be taking a lot more pairs of photos to make 3D images, along with the HDR images!
(PS: Please leave a comment if you know where to get 3D glasses in Centretown...)
[Look for more one-photo posts under the label Singles]
I realized a 3D image would be an effective way of doing it, and the wiggle stereoscopy technique would work. By making an animated GIF of two images taken side-by-side, I'd be able to convey it.
Once I had the images, I realized I could do even better: make a true red-blue anaglyph in GIMP, with the guidance of this YouTube video. Get out your red and blue 3D glasses, it works!
Here are the component images anyway. You can download them (or open them in separate tabs) and switch back and forth between them to get a similar effect:
(PS: Please leave a comment if you know where to get 3D glasses in Centretown...)
[Look for more one-photo posts under the label Singles]
Monday, April 25, 2011
My first HDR!
Okay, the short version is that I'd expected to spend much of the weekend preparing a supply of posts for the coming weeks, but instead got caught up with other things.
However, I did get a couple nighttime shots of the stained glass windows backlit at the Peace Tower Church on Bronson and MacLaren (formerly Erskine Presbyterian). As I normally do with nighttime shots, I took a few different exposures (since the camera's LCD screen doesn't reliably tell you if it came out right). But this time, I did something different from my previous nighttime posts...
This time I compiled a couple shots into an HDR (high dynamic range) photo! While I understand the concept—that you combine the dim parts of bright photos and the bright parts of dim photos to get a photo that isn't too over- or under-exposed—I thought you had to have a fancy camera.
Then a couple weeks ago Justin Van Leeuwen posted an awesomely vivid HDR shot of Bonkers Sports Bar in Hintonburg. The key is that he says in the description he did it with his point-and-shoot. So tonight as I was looking through the various exposures of this photo, I figured I'd try it out. Googling brought up this instructable on composing HDR photos with the GIMP. As a result, I don't have to choose between the shot where the stone is too dark or the one where the windows are overexposed. Now I wish I hadn't deleted the extra nighttime exposures from the canal this year!
While I prefer a minimalist approach to postprocessing (most photos I don't do anything to before posting them), only making adjustments to make things look more like they do with the eye, others like Chinatown's Robin Kelsey like to play around to show things in a way the eye can't, making frequent use of HDR, various light filters, and lately his fisheye lens.
As for why the single post instead of the promised longer one, I ended up taking about 400 photos this long weekend. Mostly of things around town--including many parts of Centretown not yet in my photo collection--and of the new Longfields station out in Barrhaven on my way back this afternoon from a family Easter brunch. I would have taken even more if I'd gotten to the Ottawa Congress Centre open house on Saturday, though it was pretty rainy most of the day anyway.
In essence, I spent most of the weekend taking photos and a bit of time sorting them, when I had planned to spend a lot of time assembling my sorted photos into posts to ensure a good supply for the coming weeks. As much as I'd like to do that today, the weather forecast is too good to be spending Easter Monday indoors! Out with the camera!
[Look for more one-photo posts under the label Singles]
However, I did get a couple nighttime shots of the stained glass windows backlit at the Peace Tower Church on Bronson and MacLaren (formerly Erskine Presbyterian). As I normally do with nighttime shots, I took a few different exposures (since the camera's LCD screen doesn't reliably tell you if it came out right). But this time, I did something different from my previous nighttime posts...
This time I compiled a couple shots into an HDR (high dynamic range) photo! While I understand the concept—that you combine the dim parts of bright photos and the bright parts of dim photos to get a photo that isn't too over- or under-exposed—I thought you had to have a fancy camera. Then a couple weeks ago Justin Van Leeuwen posted an awesomely vivid HDR shot of Bonkers Sports Bar in Hintonburg. The key is that he says in the description he did it with his point-and-shoot. So tonight as I was looking through the various exposures of this photo, I figured I'd try it out. Googling brought up this instructable on composing HDR photos with the GIMP. As a result, I don't have to choose between the shot where the stone is too dark or the one where the windows are overexposed. Now I wish I hadn't deleted the extra nighttime exposures from the canal this year!
While I prefer a minimalist approach to postprocessing (most photos I don't do anything to before posting them), only making adjustments to make things look more like they do with the eye, others like Chinatown's Robin Kelsey like to play around to show things in a way the eye can't, making frequent use of HDR, various light filters, and lately his fisheye lens.
As for why the single post instead of the promised longer one, I ended up taking about 400 photos this long weekend. Mostly of things around town--including many parts of Centretown not yet in my photo collection--and of the new Longfields station out in Barrhaven on my way back this afternoon from a family Easter brunch. I would have taken even more if I'd gotten to the Ottawa Congress Centre open house on Saturday, though it was pretty rainy most of the day anyway.
In essence, I spent most of the weekend taking photos and a bit of time sorting them, when I had planned to spend a lot of time assembling my sorted photos into posts to ensure a good supply for the coming weeks. As much as I'd like to do that today, the weather forecast is too good to be spending Easter Monday indoors! Out with the camera!
[Look for more one-photo posts under the label Singles]
Subscribe to:
Posts (Atom)